1. For more accurate reporting for your advertiser, you'll want to add the Advertiser first. To do so, login to the CMS and then go to Modules > PlasmaAds
2. Once you are there, look to the right of your screen and click on "Add Advertiser"

3. Fill out the information form that pops up and click "Add Advertiser"
4. Next you'll want to create the Campaign. Still on the PlasmaAds dashboard, look towards the bottom of the screen and click "Add Campaign"

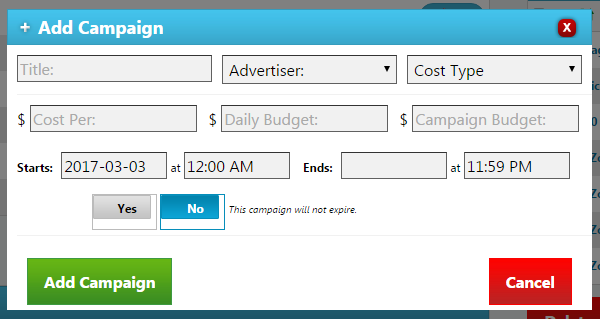
5. Fill out the Add Campaign form (as seen below)

-
Give the Campaign a Title, such as "Q1 2017 Campaign"
-
Select the advertiser you created in Step 3 from the dropdown
-
Set your cost type (whether you are charging them CPM, CPC, or Fixed Rate)
-
If FIXED, only set the total amount in the Campaign Budget
-
Set the campaign start and end time.
-
If the campaign will expire, set the expiration date/time and change the toggle from "No" to "Yes"
-
Click "Add Campaign" and you'll be ready to load in the first ad for this campaign.
6. Once the Advertiser and Campaign have been created, click "Add Ad" (in the bottom right corner of the "Recent Ads" in the PlasmaAds dashboard)
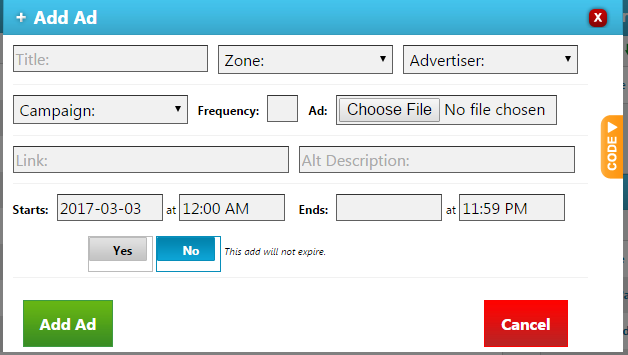
7. Fill out the Add Ad form:

-
Set the title for the ad so you can remember it in the future, i.e. "March 2017"
-
Select the Ad Zone you would like for your ad to appear in
-
Select the Advertiser you created in Step 3 from the dropdown
-
Select the Campaign you created in Step 5 from the dropdown
-
Set the frequency to 10
-
Select the image from your computer with the "Choose File" button (Make sure the image is a JPG or PNG at 72dpi and that it is sized to 300x250 pixels)
-
Type in or paste the hyperlink (including http:// ) for where the ad should link to when users click on it.
-
Use the "Alt Description" to describe to users what they are clicking on (i.e. "Advertisement for Q1, March 2017")
-
Set the ad start and end time (the ad start and end date/time should match the campaign start and end date/time for accurate reporting)
-
If the ad will expire, set the expiration date/time and change the toggle from "No" to "Yes"
8. Check the homepage for your ad to appear and click the link to make sure it works.


 Made in the U.S.A.